You must assign a benefit profile to any employee that was offered coverage under your company benefit plans at any time during the reporting year.
This helps the system determine which ACA code should be generated on Line 14 of your 1095C forms. Select one of the methods below to complete this step.
Please follow the manual instructions to assign profiles for new employees.
OPTION 1: MANUALLY ASSIGN THE BENEFIT PROFILE TO EMPLOYEES THAT WERE OFFERED COVERAGE.
1. Navigate to Select Menu  > Team
 > My Team> Employee Information,
2. Select the employee that was offered coverage. 
3. Locate the “Profiles” section and enter the applicable profile in the “Benefit” field.
a. Employees offered coverage for the full year: 
b. New Employees that were not offered coverage all year:
i. Use the plus sign next to the profile to add another line item
ii. Leave the bottom line blank
iii. Add benefit profile to top line and enter date that employee was eligible for benefits (Medical if you are tracking ACA)

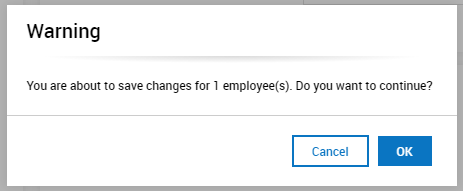
4. Select SAVE button in top right corner of your screen
5. You will notice a warning that shows in the top of your screen referencing a change to the benefit profile, click on the blue hyperlink for that warning
6. In the popup that shows you will override the date of the benefit profile so that even though the new hire/newly benefit eligible employee might not be eligible until 8/1/2020, you want the system to give them access to select which benefits they want via the online enrollment tool as soon as possible. Populate the popup with the benefit profile that you just assigned them, put their hired date in the start date and the end of their enrollment window (usually 30 days from new hire or newly eligible date) in the end date.
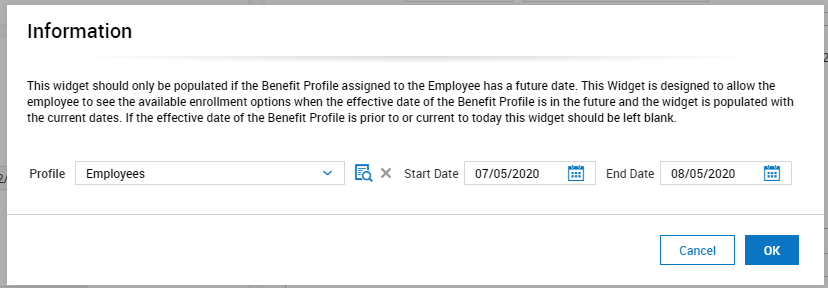
7. Click OK
OPTION 2: USE MASS EDIT TO ASSIGN THE BENEFIT PROFILE TO A GROUP OF EMPLOYEES.
Navigate to Main Menu > Admin > Mass Edit > Mass Edit Profiles
Select all employees who you intend to assign the “Benefit” profile to via the check box to the left of the employee’s name or id number.
1. Terminated employees may not show in the default view. To view terminated employees, remove the terminated filter from the Employee Status column
2. You can use filtering to help select the correct employees, if applicable, by using the three blue ellipsis option in the upper left corner and select Add/Remove columns.
3. Once you have selected all applicable employees, select MASS EDIT in the upper right corner of your screen.
4. In the profiles section, select the applicable benefit profile with correct dates as shown below: 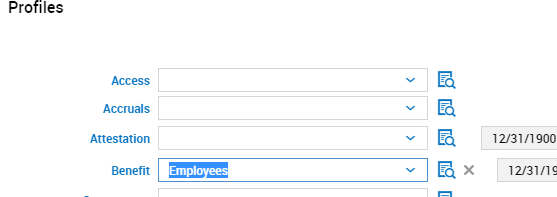
5. Select Apply Change in the upper right corner of your screen.
6. On the following warning box, select OK